
Knowing how to clip dog nails properly comes down to one thing: knowing exactly where the quick is before you cut. Get that wrong — going in blind, rushing a wriggly paw — and that’s how most nail-trimming injuries happen. Done properly, it’s a five-minute routine. This guide covers the actual technique: how to hold the paw, where to cut, and what to do if you get it wrong. It assumes your dog will tolerate having their paws handled. More on what to do if yours won’t, below.
Quick Look
Get your dog used to the clippers before you start. Hold the paw firmly, cut only the tip in small increments, and stop the moment you see a chalky or pink centre appear — that’s the quick. Reward after every nail, not just at the end.
TABLE OF CONTENTS
What Is the Quick (Dog Nail Anatomy)
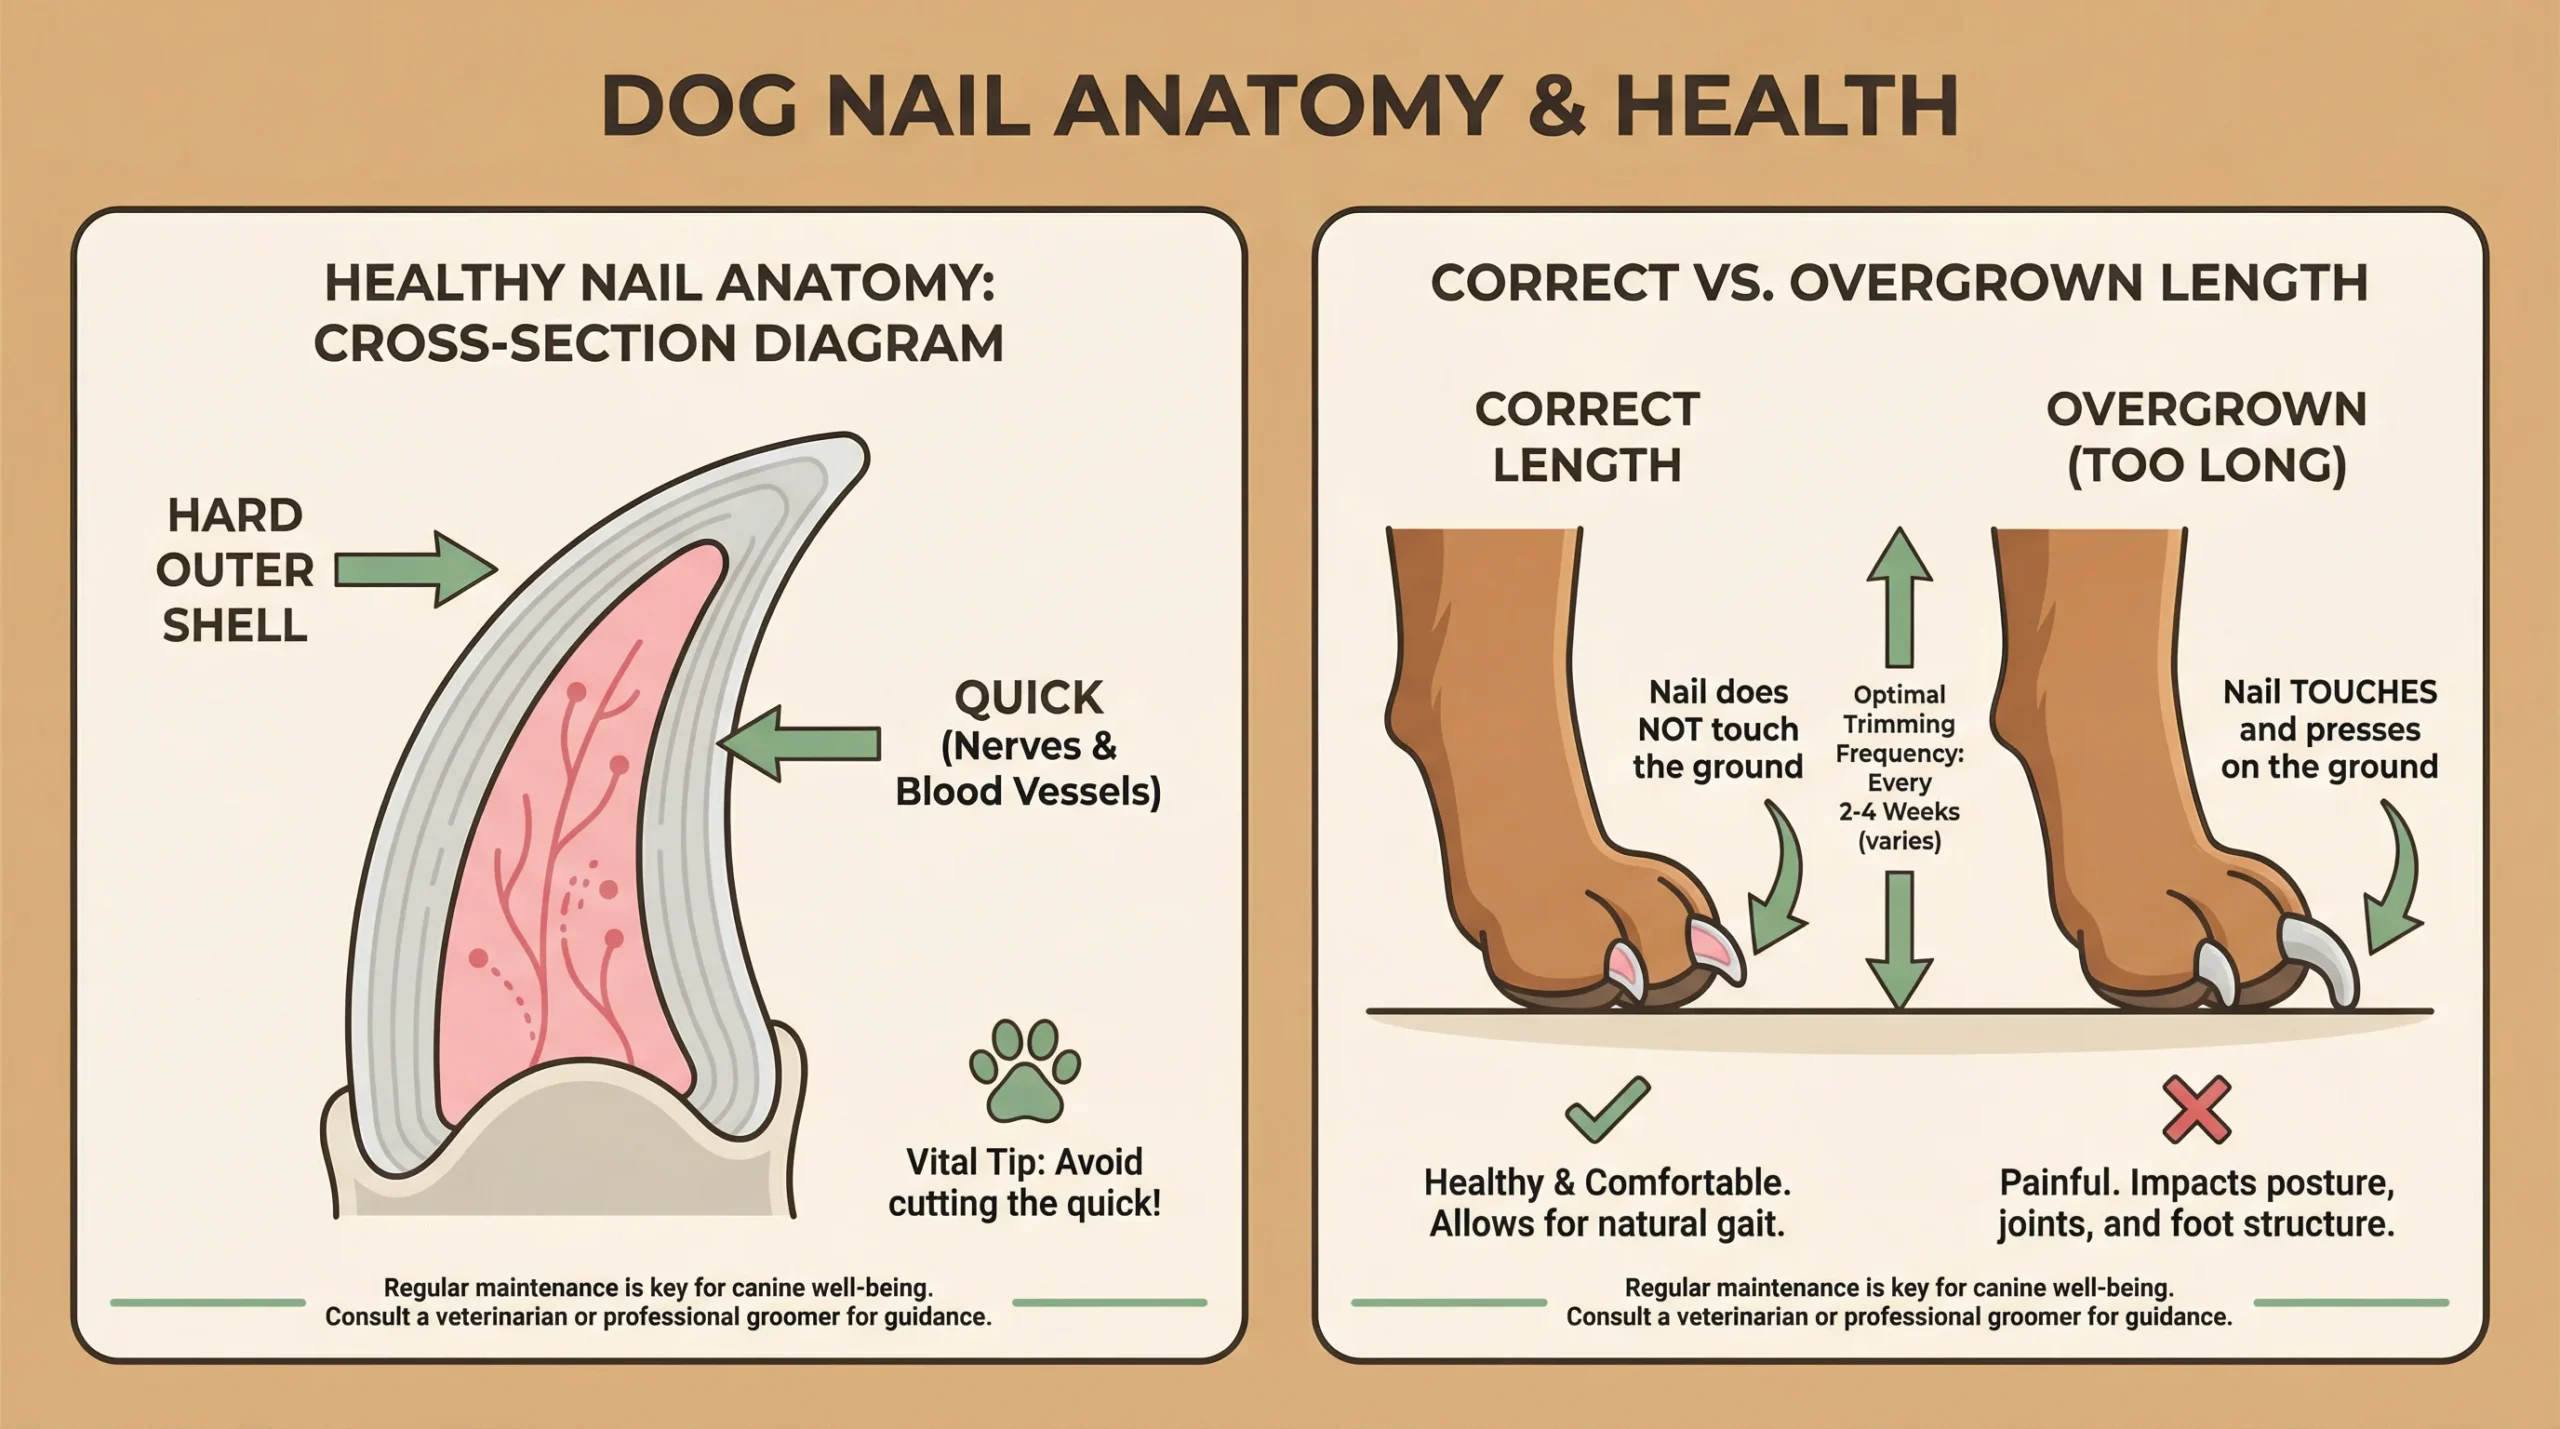
A dog’s nail is built in two layers. The outer shell is hard keratin — the same material as the nail itself, with no feeling in it. Inside that shell sits the quick: a core of nerves and blood vessels that supplies the nail and grows along with it. Cut into the shell and nothing happens. Cut into the quick and it bleeds and hurts, which is why “where’s the quick” is the one question every part of this guide keeps coming back to.
On light or white nails, the quick is easy to spot — it shows as a pink or reddish line running down the centre of the nail, visible through the shell. On dark or black nails, there’s no visible line at all, which is a different enough problem that it gets its own guide below.
Here’s the part most nail-care advice skips: the quick recedes if you trim regularly. Nails that are left to grow long let the quick grow with them, which is exactly how “just take a bit more off” turns into a caught quick. Dogs who get shorter, more frequent trims tend to keep the quick further back from the tip, which gives you more room for error over time — not less. It’s the same core principle PDSA’s vet-written nail clipping guidance points to as well.
Signs your dog’s nails need trimming:
- Audible clicking on hard floors
- Nails visibly extending past the paw pad when your dog is standing
- Nails starting to curve or catch on carpet, bedding, or fabric
Tools You’ll Need
There are three tool types, and the right one depends on your dog more than personal preference:
- Guillotine clippers — a blade slides across a fixed hole. Quick and clean on small-to-medium nails, but the hole size limits how thick a nail it can handle.
- Scissor (bypass) clippers — two curved blades cross like scissors. Better for thicker or larger nails, and the cutting angle is easier to control.
- Rotary nail grinder — files the nail down gradually instead of cutting it in one motion. Slower, but the gradual removal makes it much harder to take off too much in one go — useful if your dog has dark nails, or if you’ve caught the quick before and lost confidence with clippers.
Scissor clippers work fine for most dogs, but a nail grinder is worth the switch for large or giant breeds with thick nails, or anyone with a dark-nailed dog where the usual visual cues don’t apply. More on why, below.
If what you’re really asking is whether you can just use the human nail clippers already in the bathroom cabinet instead of buying a dog-specific tool, we’ve covered that separately in our honest breakdown of human clippers on dog nails.
Before You Start
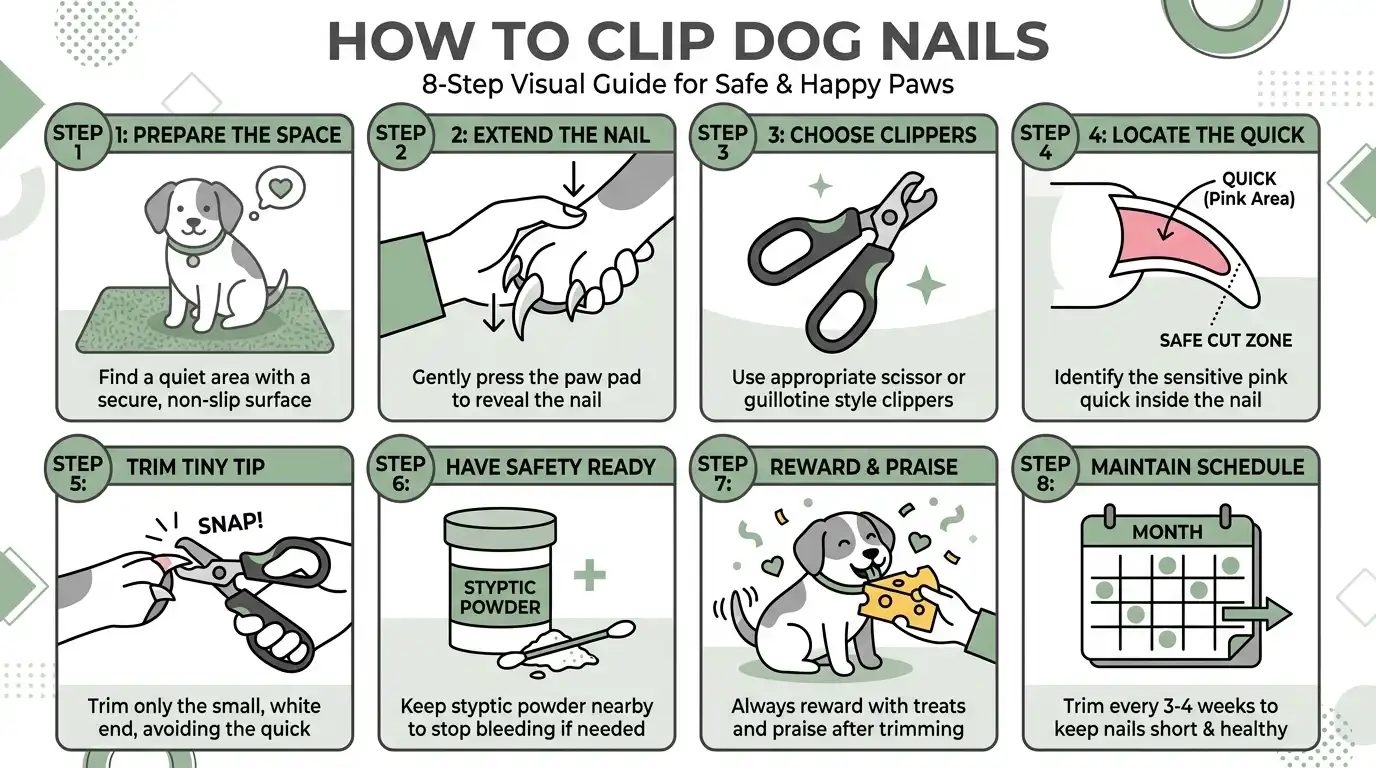
Find a calm, well-lit spot, put your dog on a non-slip surface so they’re not fighting for footing on top of everything else, and have treats ready. Let your dog sniff and investigate the clippers or grinder before it ever touches a nail — a few short sessions of just handling the paw and running the (switched-off) tool near it will do more for a calm trim than anything you do on the day itself.
Important: If your dog pulls away hard, growls, snaps, or genuinely panics — rather than just the normal fidgeting — stop. This guide is for a dog who tolerates handling, not one who’s fighting it. Forcing it through tends to make the next attempt worse, not easier.
I learned this one directly with Dexter. When he was a puppy, around three to six months old, our groomer could bathe him without any issue but called me one day to say she couldn’t get through his nails — he wasn’t having it, and she wasn’t going to force a puppy who was clearly uncomfortable. Fair enough, and honestly the right call on her part.
Since I understood Dexter’s triggers better than anyone else was going to, I decided to take it on myself rather than push a stranger to do something he was actively resisting. That meant learning to desensitise him properly first, which is its own process — we’ve written up exactly how we did it in our full desensitisation guide.
Step-by-Step: How to Clip Dog Nails
1. Position your dog. Sitting or lying on a non-slip mat, beside you rather than facing you, tends to work best — it keeps them settled and gives you a clear angle on the paw.
2. Secure the paw. Hold the paw firmly and use your thumb to press gently on the pad, which extends the nail and stops it moving mid-cut.
3. Line up the cut. Position the clipper blade perpendicular to the nail, or at roughly a 45-degree angle if you’re using scissor-style clippers. Aim for the tip only — a couple of millimetres — not the whole overgrown length in one go.
4. Check for the quick before you cut. On light nails, look for the pink line and stay clear of it. Dark nails hide it completely, which changes the technique — see the black-nail section below.
5. Make the cut. One clean squeeze rather than a sawing motion. If your dog tenses up, it’s fine to do one or two nails and finish the rest in a later session — a calm dog and a slow week is a better outcome than a stressed dog and a finished paw.
6. Don’t forget the dewclaws. The small nail higher up on the inner front leg (and sometimes back legs) doesn’t wear down naturally since it never touches the ground, so it needs trimming every time or it can grow round and dig into the paw.
7. Reward and finish. A treat and some praise after every nail, not just at the end — it’s what actually builds the association that makes the next trim easier.
If You Nick the Quick
Even with the right technique, this happens — and it’s happened here. Early on with Dexter, before I’d properly worked out where his quick sat, I caught it with standard scissor clippers. Dexter barely reacted, but it was a bloody mess and, with no styptic powder to hand and no real idea what I was doing, it took me hours rather than minutes to get it stopped. Done properly, with pressure and styptic powder ready in advance, that’s a five-minute job — I’ve written up exactly what happened and the full first-aid steps in our dedicated guide to stopping a bleeding nail, worth reading before you need it, not after.
That incident is also the reason I switched Dexter over to a rotary grinder rather than clippers. Between his size, his solid black nails, and the fact I now knew exactly how easy it was to misjudge, gradual filing gave me far more room to stop in time. I also started trimming more often — shorter, more frequent sessions rather than waiting until the nails were properly overgrown — specifically to keep the quick receding and give myself more margin for error, not less.
Important: If the bleeding hasn’t slowed within a few minutes of applying proper pressure and styptic powder, or your dog seems unusually distressed or unwell, contact your vet rather than continuing to manage it at home.
When You Should Not Clip
There are a few situations where it’s safer to wait or get professional help rather than clip as usual:
- Cracked, split, or infected nails — trimming can worsen damage or delay healing. Get a vet’s opinion first.
- Severe fear or aggression during handling — growling, snapping, or panicking is a sign to stop and work on desensitisation (see our guide) or bring in a professional groomer, rather than pushing through.
- Swelling around the nail or paw — could mean inflammation, infection, or an injury that trimming would aggravate.
- A recent nail or paw injury — wait until it’s fully healed; even light pressure can reopen a wound.
When in doubt, waiting is always the safer call than risking an injury.
How Often Should You Trim
Enough to keep the quick receding, without over-handling the paw — the exact schedule depends on your dog’s age, breed, and how much they naturally wear their nails down on hard ground. We’ve broken the full schedule down in our dedicated guide to trim frequency.
Dark or Black Nails
The technique above still applies, but you lose the visible pink guideline, so the visual cues you’re watching for are different. We’ve covered exactly what to look for in our guide to cutting black dog nails.
Frequently Asked Questions
What is the correct angle to cut a dog’s nails?
Roughly 45 degrees if you’re using scissor-style clippers, cutting from top to bottom. Guillotine clippers and grinders don’t need an angled approach — the tool does that part for you.
How much of the nail should I cut off in one go?
Just the tip — a couple of millimetres at most. Nail clipping is about removing a little, checking the cross-section, and repeating, not taking off the whole overgrown length in one cut.
How many nails does a dog have?
Most dogs have five nails on each front paw (four regular nails plus a dewclaw) and four on each back paw, unless they also have rear dewclaws. Every nail needs checking at each trim, including the dewclaws, which are easy to miss since they don’t touch the ground.
Can I clip my dog’s nails without a second person to help?
Yes, for most dogs — the steps above are written for one person. A helper is useful for a larger or wrigglier dog, mainly to hold them steady, but it isn’t essential for a dog who already tolerates paw handling.
Is it okay to clip a dog’s nails straight after a bath?
It can actually help. Nails soften very slightly when wet, which some owners find makes them marginally easier to cut, especially on thicker nails. It’s a nice-to-have rather than a rule — dry nails clip just fine too.
How do I keep my dog calm during a routine nail trim?
Short sessions (five to ten minutes), a treat after every nail rather than only at the end, and a quiet, well-lit spot away from distractions. If calm handling alone isn’t working and your dog is actively distressed rather than just fidgety, that’s a sign to work through proper desensitisation first, not push through the trim.
What’s the best approach for clipping a large or giant breed dog’s nails?
The technique doesn’t change, but the margin for error does — bigger nails mean a bigger quick, and it’s easy to underestimate how much pressure a large paw needs to stay steady. A rotary grinder tends to suit large breeds better than clippers, since the gradual filing gives you more warning before you reach the quick.
Can I clip my dog’s nails myself, or should I use a groomer?
DIY is fine for a dog who tolerates paw handling and where you can see or reasonably judge the quick. A groomer or vet is the better call for anxious dogs, dogs with a history of resisting it, or nails so overgrown you’re not confident where the quick has ended up.
What tools are safest for beginners?
Clippers with a built-in safety guard, or a low-noise grinder, both reduce the risk of taking off too much in one go — a sensible starting point if you haven’t done this before.
Why might my dog’s nail bleed even if I’m careful?
Usually because the quick has grown further down the nail than expected, which happens on overgrown nails or ones that haven’t been trimmed regularly. It can happen to anyone, however careful — see our guide on treating a bleeding nail for what to do next.
Do dewclaws need trimming the same way as the other nails?
Yes, using the same technique — small cuts, checking for the quick as you go. They’re just easier to overlook since they sit higher up the leg and never touch the ground to wear down naturally.
How do I know if my dog’s nails have grown too long?
Listen for clicking on hard flooring, check whether the nail extends past the paw pad when your dog is standing normally, and look for any curving or catching on soft surfaces. Any of those is a sign it’s time to trim.
