When it comes to clipping dog nails, or specifically how to clip dog nails, I know it can feel a bit daunting at first. Research indicates that approximately 70% of dog owners struggle with nail trimming, often due to their pets’ anxiety. But with a bit of patience, you can make this grooming task a breeze for both of you.
Cutting dog nails incorrectly can cause pain, bleeding, and long-term fear of grooming. But when done properly, nail clipping is quick, safe, and stress-free for both you and your dog. This guide walks you through exactly how to clip dog nails safely — even if your dog hates having their paws touched.
This guide is written using veterinary grooming best practices and behaviour-based handling techniques commonly recommended by UK professionals.
Quick Look
To clip your dog’s nails, start by gently handling your dog’s paws and familiarising them with the clippers. Trim the tip of each nail while avoiding the quick, rewarding your dog with treats to create a positive experience. Regular trims every 2-4 weeks will help keep their nails healthy and manageable. Finally, remember only trim your dogs nails if you are able to do so.
TABLE OF CONTENTS
What You Need To Know About Dog Nails

Trimming a dog’s nails is essential for their health and comfort, as it prevents pain and potential injuries. Long nails can lead to joint issues and discomfort while walking. By understanding proper nail care, we can keep our furry friends happy and active.
Importance of Dog Nails
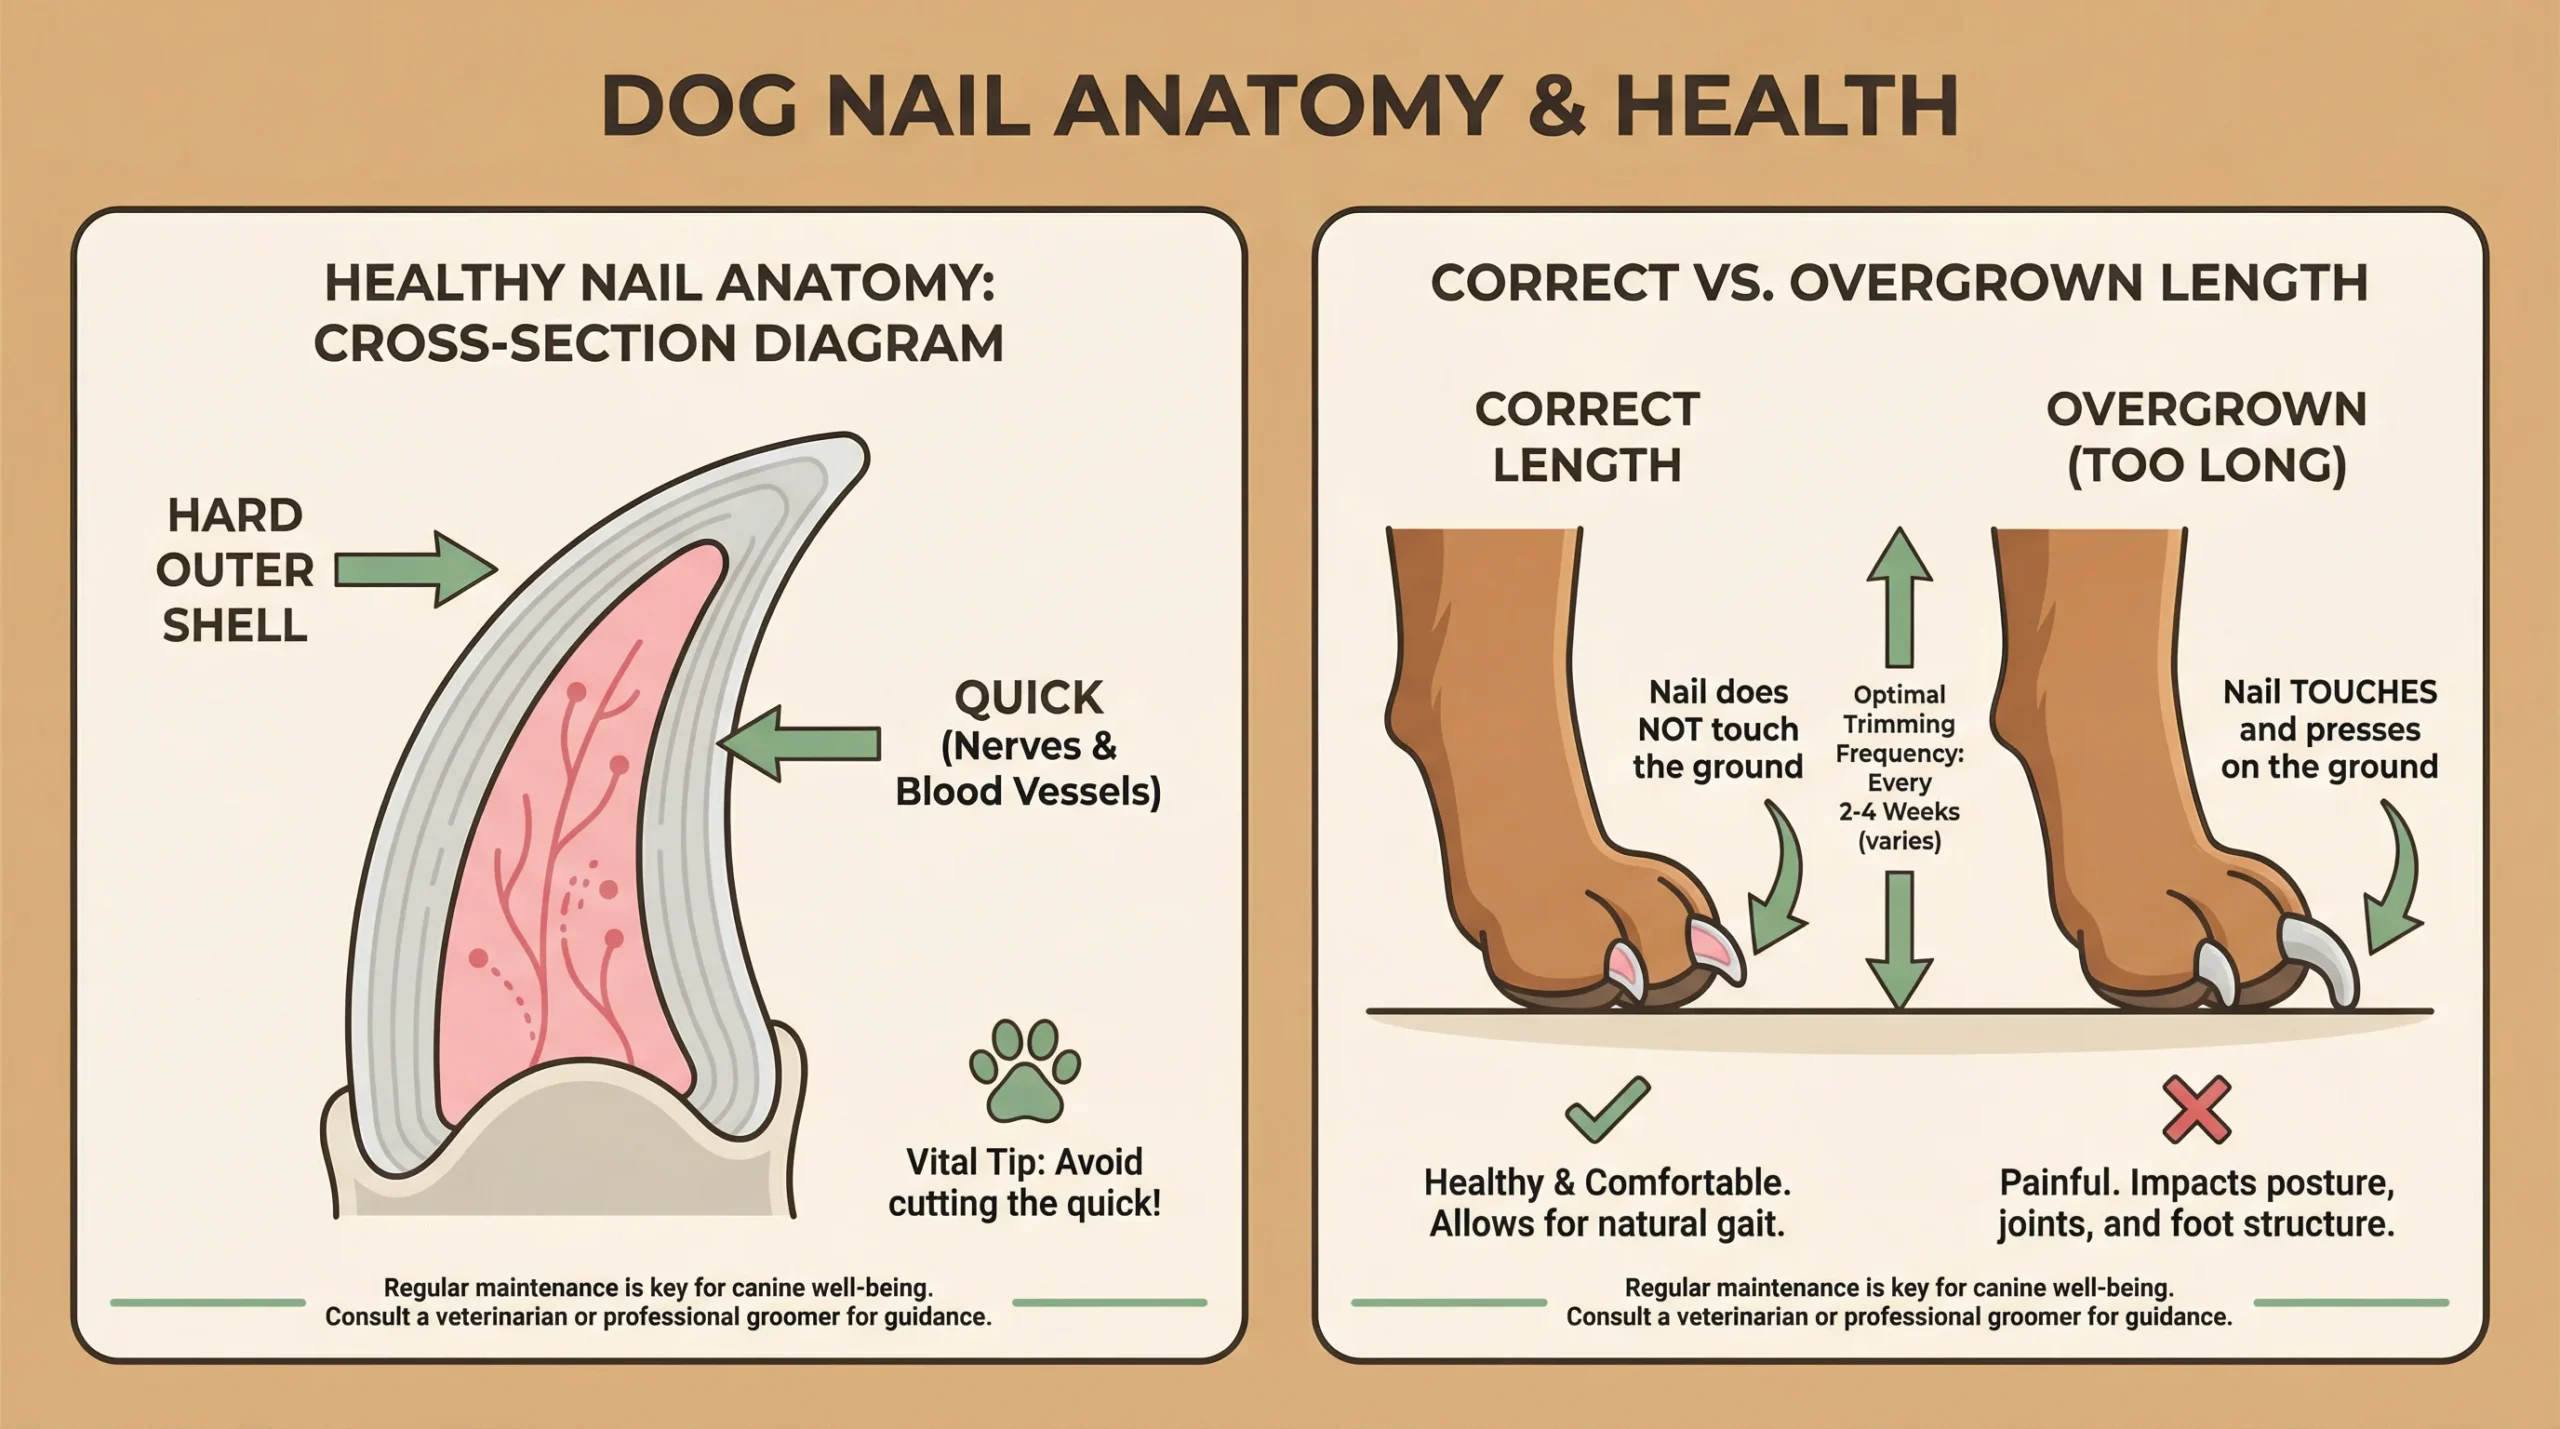
When I think about my dog’s nails, I realise just how important they are for his overall health. Did you know that a dog’s nails consist of two main parts? The quick, which contains nerves and blood vessels, and the hard outer shell that protects it.
Signs That Nails Need Trimming
I always pay attention to signs that my dog’s nails need trimming. If I hear them tapping on hard surfaces or see them extending past the pads of his paws, it’s time to act. Generally, nails should be kept short enough so that they don’t touch the ground when he walks.
Risks of Neglecting Nail Care
Neglecting nail trimming can lead to several health issues. For instance, long nails can cause pain and joint problems as they push into the nail bed. A staggering 60% of dog owners report that their pets suffer from nail-related injuries due to neglecting this simple grooming task.
Anatomy of Dog Nails
Understanding the anatomy of dog nails helps me avoid mistakes during trimming. For light-coloured nails, the quick is easily visible; however, with dark nails, it can be a challenge. I often use a flashlight to help identify the quick on those tricky black nails. Dogs with dark or black nails require extra care, as the quick is not easily visible. If you’re unsure where to trim, our guide on how to cut a dog’s black nails safely explains exactly what visual signs to look for.
Long-Term Benefits of Regular Trimming
I also keep in mind that regular nail trims can prevent more significant health problems down the line. For instance, long nails may snag on surfaces, leading to painful injuries or infections. It’s a small effort that goes a long way in ensuring my dog’s well-being and comfort.
Trimming your dog’s nails
To trim dog nails, it’s essential to prepare for the experience. Proper preparation can significantly impact how your dog behaves during the process. Let’s gather the necessary tools, create a comfortable environment, and ensure that both you and your dog are ready for a smooth experience.
Necessary Tools
First things first: we need to grab the right tools. You’ll want to choose between guillotine-style or scissors-style clippers, depending on what feels best for you. If you prefer a smoother finish, a nail grinder can also be a great addition to your toolkit.
Creating a Comfortable Environment
Next, let’s focus on the environment. Find a calm, quiet spot where your pup feels safe and secure. I always recommend using a non-slip mat to keep them stable while you work, which can help reduce any anxiety they might feel.
Positive Reinforcement
Having some treats on hand is a game-changer. Positive reinforcement can transform a stressful experience into an enjoyable one. Giving your dog treats during the nail trimming process will help them associate it with something positive.
Prioritising Your Dog’s Comfort
It’s vital to keep your dog’s comfort in mind throughout this process. Ensure they are in a position that feels secure and relaxed, which will make it easier for you to clip their nails. If your dog feels safe, they’ll be more willing to cooperate.
Mental Preparation
Lastly, prepare yourself mentally for the task ahead. Nail trimming can be a little nerve-wracking, but with the right mindset, it can become a rewarding experience. Take a deep breath and get ready to tackle those nails with confidence.
Introduce your dog to the tools
Getting your dog comfortable with nail clipping can make a world of difference. You have to introduce your dog to the tools. For instance, on day one, I let them sniff the clippers and reward them with treats—just a small piece of cheese or their favourite snack works wonders. Dog nail trimming is a gentle and rewarding process, so stay calm and take your time!
I gently touch my dog’s paws for 5-10 minutes each session to help them get used to handling, making it feel like play. By day three, I can bring the clippers closer while giving praise and treats. Playing soft music creates a calm environment, which helps reduce anxiety during nail trims.
Step-by-Step Guide: How to Clip Dog Nails

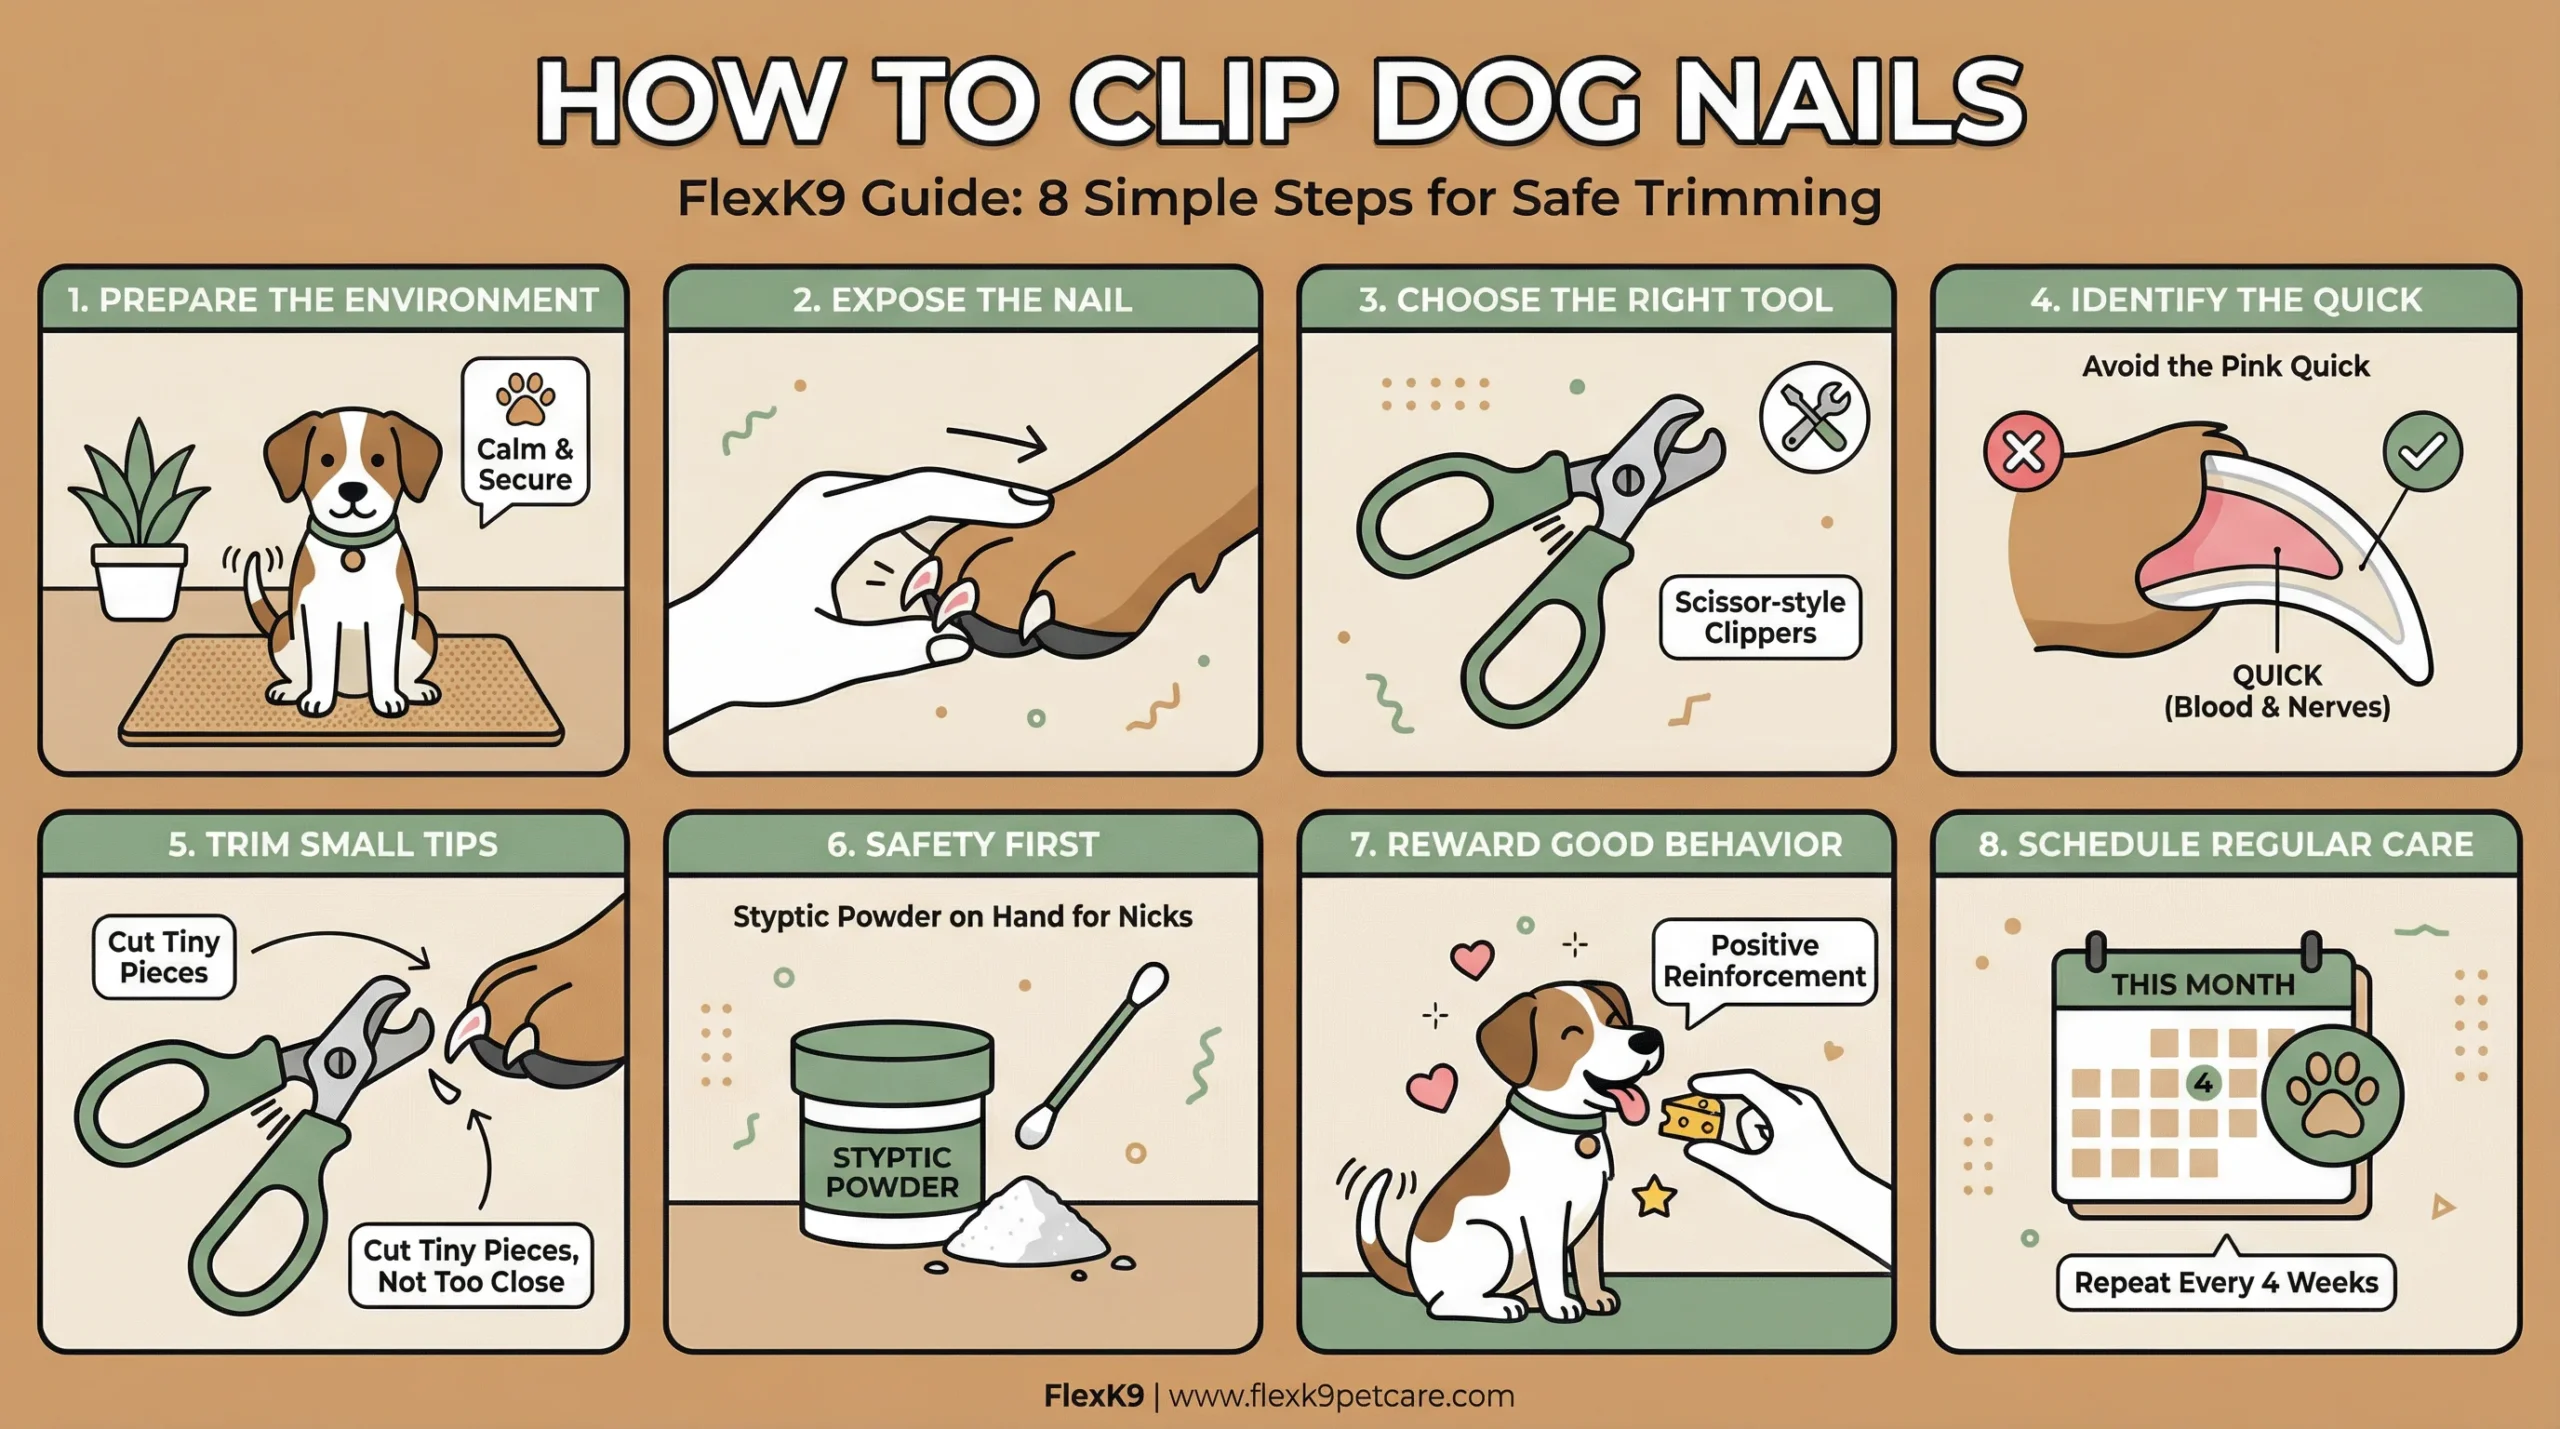
Trimming your dog’s nails doesn’t have to be a stressful experience. By breaking it down into manageable steps, you can make it a positive and routine part of your dog’s grooming. Here’s how to do it, step by step:
Step 1: Position Your Dog
Begin by placing your dog in a comfortable position. I find it works best if my dog sits beside me or lies down on a non-slip mat. This way, they feel secure and relaxed, making the whole process smoother. The first time you cut a dogs nails.
Step 2: Secure the Paw
Gently take one of your dog’s front paws in your hand. Use your thumb to press down on the pad, which helps extend the nail and makes it easier to see. This simple step can reduce any squirming as you prepare to clip.
If your dog pulls away, resists, or becomes distressed during nail trimming, you may need to adjust your approach — especially with anxious or reactive dogs. You can read our detailed guide on how to cut an uncooperative dog’s nails safely for step-by-step handling tips.
Step 3: Grab the Clippers
Select your nail clippers and prepare them. If you’re using scissors-style clippers, position them at a 45-degree angle to ensure a clean cut. Aiming for just the tip of the nail—about 1/8 inch—is a safe way to start, especially for those new to trimming.
Step 4: Identify the Quick
For dogs with white nails, look for the pink area to locate the quick. If your dog has darker nails, it can be a bit trickier. Look for a chalky white area before reaching the quick, which will help you avoid any painful cuts.
Step 5: Make the First Cut
When you’re ready, make your first cut. Focus on clipping just the very tip of the nail to prevent hitting the quick. If your dog seems anxious, it’s perfectly fine to clip only one or two nails during this session; patience is key.
Step 6: Handle Mistakes Calmly
If you accidentally cut the quick and your dog starts to bleed, stay calm. Follow these steps to stop a dog’s nail from bleeding safely at home, including using styptic powder and applying gentle pressure for a few seconds. Comfort your dog with soothing words and a treat to help ease their anxiety.
Step 7: Celebrate Success
After each trimming session, reward your dog with praise or a treat. Positive reinforcement helps your dog associate nail trimming with good experiences, making future sessions much easier and less stressful.
Step 8: Keep a Regular Schedule
Aim to trim your dog’s nails every 2-4 weeks. Regular trims will keep their nails healthy and comfortable, making the process quicker and more efficient over time.
When You Should Not Clip Your Dog’s Nails
While regular nail trimming is essential for most dogs, there are situations where clipping should be avoided or delayed. Cutting nails at the wrong time can cause pain, worsen injuries, or create long-term fear around grooming.
Avoid clipping your dog’s nails if you notice any of the following:
Cracked or Infected Nails
If a nail is split, cracked, bleeding, or shows signs of infection (such as redness, discharge, or a strong odour), trimming can make the problem worse. Infected nails are often painful, and cutting them may lead to further damage or delayed healing. In these cases, it’s best to seek advice from a vet before attempting any grooming.
Severe Anxiety or Aggression
Dogs that display intense fear, growling, snapping, or panicked behaviour during nail handling are at a higher risk of injury. Forcing nail clipping in these situations can reinforce fear and make future grooming even more difficult. A professional groomer or vet can help manage anxious dogs using proper handling techniques or behaviour-based desensitisation.
Visible Swelling Around the Nail or Paw
Swelling around the nail bed or paw may indicate inflammation, infection, or trauma. Trimming nails when swelling is present can increase discomfort and mask underlying issues that require treatment. Always allow swelling to resolve and identify the cause before resuming nail care.
Recent Nail or Paw Injury
If your dog has recently torn a nail, broken one, or injured their paw, avoid trimming until the area has fully healed. Even light pressure can reopen wounds or cause pain, making your dog more resistant to nail care in the future.
When in doubt, delaying nail clipping is always safer than risking injury or distress. If you’re unsure whether it’s safe to proceed, a vet or experienced groomer can assess your dog’s nails and recommend the best next step.
Post-Clipping Care
After clipping your dog’s nails, focus on post-clipping care, which is crucial for a positive experience. If you accidentally cut the quick, apply styptic powder to stop the bleeding within 1-3 minutes.
To prevent overgrowth and discomfort, it’s important to trim nails at the right intervals. If you’re unsure how often this should be done, see our guide on how often to clip a dog’s nails based on age, breed, and activity level.
Once managed, clean any blood with hydrogen peroxide on a cotton ball to avoid causing distress. Remember to reward your dog right after the session with treats or belly rubs to build a positive association. Aim to trim nails every 2-4 weeks to maintain good nail health and make future trims easier. With patience and consistency, you’ll create a safer and more enjoyable experience for both you and your pup.
Maintaining a regular nail-trimming schedule is crucial for your dog’s health. Aim to trim their nails every 2 to 4 weeks to prevent overgrowth and associated pain. If you hear their nails tapping on hard surfaces, it’s time for a trim!
Consistent trimming helps the quick recede, making it easier to keep your dog’s nails at a healthy length. This is especially important for dogs with darker nails, where the quick isn’t as visible.
As you establish a routine, nail trimming becomes quicker and smoother, often taking less than 15 minutes. Regular care not only keeps your dog’s paws healthy but also strengthens your bond. In addition to regular trimming, some owners prefer supportive methods to slow nail growth between clips. You can also explore how to keep dog nails short without clipping using natural, low-stress alternatives.
Final Words
Learning how to clip dog nails can be a rewarding experience for both you and your furry friend. By following the proper techniques and creating a positive environment, you’ll likely trim your dog’s nails successfully every two to four weeks. Remember, it’s all about patience and practice—soon enough, you’ll be a pro at keeping those nails in tip-top shape!
Frequently Asked Questions
What is the correct angle to cut a dog’s nails?
The correct angle to cut a dog’s nails is approximately 45 degrees.
How to trick your dog into letting you cut their nails?
Get your dog accustomed to having their paws touched. Start by gently handling their paws while giving treats.
Use a distraction technique. Have a favourite toy or treat on hand to keep them focused.
Introduce the clippers gradually. Let them see and sniff the clippers before using them.
Perform nail trimming during a relaxed time, like after a walk or playtime.
Clip one nail at a time, rewarding with treats after each clip.
If your dog resists, take a break and try again later to avoid stress.
Consider using a calming aid or pheromone spray if needed.
How do you clip a dog’s nails when the dog won’t let you?
Choose a quiet and calm environment.
Use a comfortable dog restraint, like a muzzle or gentle hold.
Have treats nearby to reward calm behaviour.
Take it slow; start by gently touching their paws and nails without clipping them.
Gradually introduce the clippers, allowing them to sniff and get used to them.
Clip one nail at a time, giving treats and praise after each nail is clipped.
If they become anxious, take a break and try again later.
Consider asking a vet or professional groomer for assistance if necessary.
How do I calm my dog down to cut nails?
Use positive reinforcement: Reward your dog with treats and praise during and after nail trimming.
Create a calm environment: Choose a quiet space free from distractions.
Get your dog accustomed: Let your dog sniff the clippers before starting and gradually introduce the process.
Use calming products: Consider pheromone sprays or calming supplements recommended by your vet.
Take breaks: Trim a few nails at a time and allow your dog to relax in between.
Keep sessions short: Limit nail trimming to 5-10 minutes to prevent stress.
Consult a professional: If necessary, seek help from a groomer or vet.
Can I clip my dog’s nails myself or should I use a groomer?
DIY is fine for calm dogs.
Groomer/vet recommended for anxiety, black nails, or past trauma.
What tools are safest for beginners?
Beginners often benefit from nail clippers with safety guards or low-noise grinders designed for dogs, as these reduce the risk of cutting the quick.

